
Joystick switcher C64
23 May 2020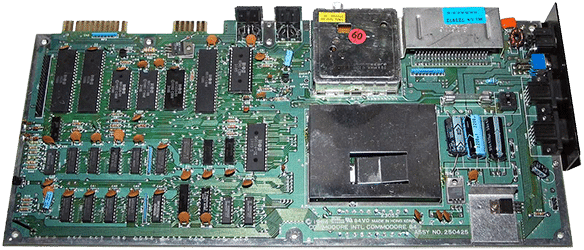
These notes are the result of repairs carried out, they may not be suitable for all models, they should be taken as a starting point to understand what may be the causes of the problem.
Retrofixes
At work...
Premise
These notes are the result of repairs carried out, they may not be suitable for all models, they should be taken as a starting point to understand what may be the causes of the problem.
To begin
The first thing to do is to visually check the state of the board, if it has oxidation, welds / tracks / damaged components, if there are swollen capacitors, etc.
(molto raro sul C64 trovare condensatori guasti, ma in schede molto vecchie come nel silver label è probabile che i condensatori sul clock siano guasti)
Often some malfunctions can be caused precisely by damaged tracks or oxidized contacts, it is always good to check and clean the pcb if necessary.
Seconda cosa, verificare la presenza delle tensioni di alimentazione e fusibili presenti, sul C64 dovete avere due tensioni, una 5V e una 9V, controllate anche i connettori e l’interruttore di alimentazione. L’interruttore non deve essere troppo molle e si dovrebbe sentire un click quando lo si accende, altrimenti è un probabile sintomo che il suo contatto interno non funzioni più bene. In questo caso è possibile usare uno spray disossidante/pulisci contatti e muoverlo ripetutamente (a computer scollegato!) per sbloccarlo. Se il contatto interno è molto sporco, potrebbe succedere che dopo l’asciugatura dello spray si blocchi nuovamente.
Don't rush! take it one step at a time, even if it seems superfluous.
Controllate anche se c’è un segnale video, es. all’accensione il computer (anche con schermo nero) deve fare un piccolo lampo e comunque avere una portante video anche se senza segnale, nei tv moderni si può vedere che la scritta “nessun segnale” sparisce e rimane uno schermo nero, nei CRT questo non accade ma si può vedere un piccolo flash all’accensione alzando la luminosità. Questo test può aiutarci a far capire se il VIC-II è guasto, in realtà anche se vediamo un lampo, si è probabile che il VIC sia buono, ma se lo zoccolo ha problemi sui contatti può dare uno schermo nero.
I encountered a card where only random characters were shown when I turned on and after a few minutes other errors, but after 3-4 minutes the computer was working correctly. This problem could have been caused by a faulty ram or rom characters, or even the cpu ... Well, none of this, it was simply the 7805 that when cold released a voltage lower than 5V and the system did not work properly. Sometimes you risk spending a lot of time looking for the fault if you don't check even the most obvious things.
In the Commodore 64 we can find a different PCB based on when and where it was produced, so I invite you to check it out here the differences between the versions, the most common (in the biscuit) was the 250407 and I will refer to this in indicating the names of the chips, if you have a C64C you will probably find an Assy250469 pcb (much more compact and with fewer components because inserted in other chips).
Most common problems and .. black screen
CIAs control the following devices:
CIA1 (U1): keyboard, joystick, paddle, datasette, IRQ.
CIA2 (U2): bus seriale, RS-232, memoria del VIC, NMI.
Ricordatevelo!. Se usate una cartuccia diagnostica e avete problemi sull’interrupt, vi dirà che il guasto sta su U1, in realtà U1 gestisce l’IRQ, l’interrupt non mascherabile è gestito da U2.
If there is a taste on one of these the related controls will not work.
Eg: Keyboard or joystick not working, screen without cursor or totally without text (borders and colors ok) can be generated by the CIA1 not working.
Very strange pattern screen could be a problem on CIA2 controlling video memory.
Failure on this ram can cause incorrect font colors and even graphics mode problems.
The SID genstice the audio of the C64, random numbers and paddles.
A problem on this chip can experience an audio signal with no voices or totally absent.
One of the most common problems on the Commodore 64 is the black screen (not to be confused with it does not turn on, the video signal is there but no image), it can be caused by many situations .. but let's not be discouraged.
Obviously read what is written above! it is important to rule out all the most trivial failures before thinking about the worst.
Where do we start?
If the pc does not display any screen, I suggest you try the dead test card (781220) because if the problem is on a ram or rom the computer can start and indicate the failure.
Download here il manuale di utilizzo della cartuccia per capire come funziona ed i possibili failure. Se per esempio il computer fa dei lampeggi, il problema è sulla ram, vi riporto la tabella della guida per trovare la ram difettosa. Per testare la ram è possibile utilizzare il metodo piggyback che consiste nel prendere una ram funzionante (stesso modello, anche di marca diversa) e posizionarla sopra quella guasta, provando poi a far partire il computer (attenzione, i pin devono toccare bene e non fare un cortocircuito). Se la ram guasta era solo quella e i suoi pin non sono in corto avrete trovato il guasto, altrimenti dovrete continuare a testarne altre.
Flashes with diagnostic card (dead test):
| N. lamp. | C64 REV A / B | C64 REV B-3 | C64 REV E |
| 1 | U12 | U9 | U11 |
| 2 | U24 | U9 | U11 |
| 3 | U11 | U9 | U11 |
| 4 | U23 | U9 | U11 |
| 5 | U10 | U10 | U10 |
| 6 | U22 | U10 | U10 |
| 7 | U9 | U10 | U10 |
| 8 | U21 | U10 | U10 |
If, on the other hand, the computer starts up and the test screen appears, you can check which component is blocking the computer and in any case exclude some of them already.
If you get a startup screen, a more thorough component test can be achieved with the diagnostic card (586220) e dei cavi da collegare al computer in modo da poter testare SID, CIA, Timer, PLA, porte seriali e altro..
Il manuale di questa scheda lo trovate here.
The main suspect (version C64 not C64C) if the card version is minore dell’ assy 250469 is the chip PLA (906114-01 o 251064-01) nominato U17 (tanto per portare fortuna), il quale è molto soggetto a rotture e spesso causa dello schermo nero. E’ possibile sostituire questo integrato con uno analogo oppure prenderne uno di nuova generazione (es: SuperPLA o PLAnkton).
Often this chip is not socketed and therefore it is necessary to unsolder it, be very careful if you want to remove it. To easily unsolder it you will need an electric desoldering iron (gun or heated pump type), if you do not have it you can proceed with a lot of patience and use the soldering iron with a tin sucker and with the help of a copper braid. A simpler way is to directly cut the pins of the integrated and remove the residues left on the pcb (but if this was not broken? .. a healthy chip was thrown away).
If, on the other hand, the pcb version is the assy 250469, la scheda avrà un chip da 64pin detto superPLA (non come quello descritto in precedenza) e al contrario del suo predecessore, non scalda ed è molto più robusto, quindi possiamo sperare che non sia lui a causare il problema e procedere con altri test.
Una semplice prova che consiglio è quella di verificare il segnale di clock (pin 1) e di reset (pin 40) sul processore (6510 / 8500) per farla occorre un oscilloscopio oppure una sonda logica.
Questo ci farà escludere subito il circuito di reset ed il clock, non sembra molto ma se invece uno di questi è guasto ci farà risparmiare molti altri test. Se non avete nulla di questi strumenti detti, potete provare il reset con un tester e verificare che dopo circa 1 secondo si porti a livello alto (circa 5v).
Let's try to remove the non-fundamental chips, already some of these can give problems at startup but the initial screen will be visible even without them.
- SID. If we remove this chip, which is usually socketed, we will no longer hear the sound and we will not be able to use analog devices. So, if after removing the SID you will see the C64 screen, you need to replace the sound chip.
- CIA. Rimuovendo entrambi i chip CIA (6526) si ottiene comunque una schermata iniziale. Si ok, senza cursore, tastiera, supporto cassette, disco… ma se gli altri componenti sono funzionanti, si vedrà la normale schermata del BASIC ed il numero corretto di byte liberi (38911). In questo caso provare a montarne uno solo per trovare quali dei due è guasto (se non fossero entrambi).
- CD4066 (250407 > U28, 250469 > U18 ). Togliendo questo chip si otterrà comunque la schermata di avvio. Il computer funzionerà senza il supporto dei dispositivi analogici.
- CD4066 (250407 > U16, 250469 > U21). Togliendo questo chip i colori non saranno corretti, ma il computer dovrebbe comunque avviarsi.
- Anche le ROM e Kernal possono essere tolti se usiamo la dead test, uno di questi in corto può non far partire la scheda.
Se dopo queste prove ancora si ottiene uno schermo nero, c’è da armarsi di tanta pazienza e provare a cercare il guasto o escludendo i chip testandoli su un’altra scheda funzionante e/o controllare con altri strumenti come sonda logica o oscilloscopio dove può essere il problema (clock, reset, bus dati…).
Spesso se il computer non parte ci possono essere altri guasti sulla scheda, di solito dopo questi integrati descritti sopra, i più probabili a guastarsi sono il processore e il VIC II, o anche la logica di gestione RAM. Occorre fare un passo alla volta e stare attenti anche se ci sono zoccoli che possono non fare più un buon contatto, soprattutto quelli vecchi con un solo contatto per pin. Se avete sotto mano una scheda rilavorata, il discorso cambia perché dipende molto da chi ci ha messo le mani prima di voli, spesso capitano piste saltate o in corto e se sono stati aggiunti zoccoli potrebbero avere questi difetti sotto di essi, spesso occorre rimuoverli e verificare.
BUONA RIPARAZIONE.
similar posts