



PicoZX
25 July 2024
Reset for Commodore 64
3 September 2024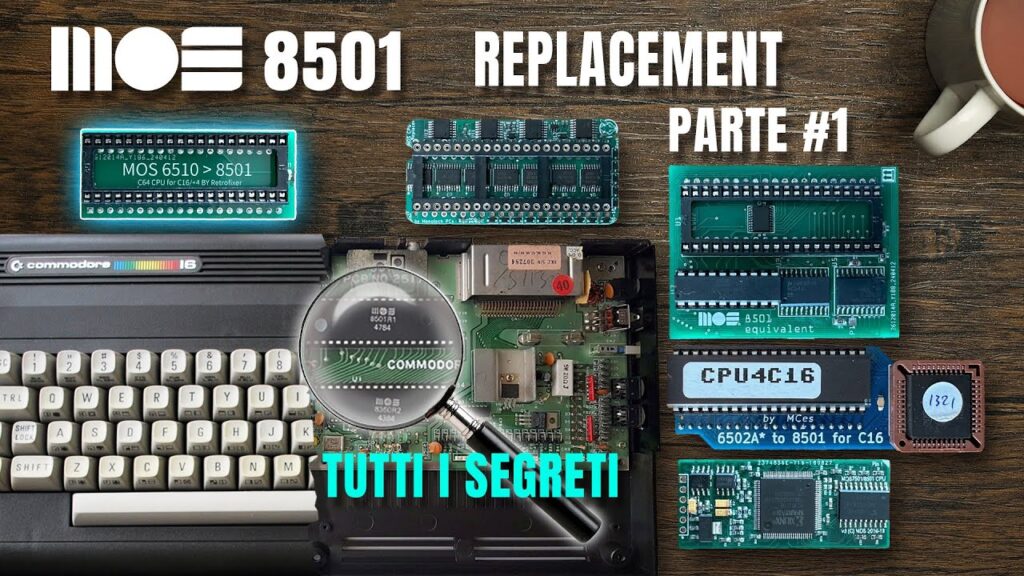
As the title suggests, in this article we’ll talk about how to fit an “alternative” processor to the Commodore 16.
As you know, this computer is part of the 264 series: three very similar computers that use the same processor and video coprocessor. This series, originally meant to offer 3 computer models for every budget, was supposed to compete with Sinclair and its ZX Spectrum, but once Tramiel left Commodore, things didn’t quite go that way.
These three models are the Commodore 116, identical to the C16 but thinner and with a rubber keyboard.
The Commodore 16, which looks like the C64 but is black, has no user port and has 16Kb of RAM.
The Plus/4 (+4), which looks like the C116, with a user port, 64Kb of RAM and some programs already built into ROM.
All these computers use a MOS 7501 or 8501 CPU and an audio/video processor called TED (7360), which handles the keyboard, video and audio. These new processors were made with cost-cutting in mind, without too many refinements; not to put too fine a point on it, but even at Commodore they’d be amazed they still work today.
These computers often suffer from the classic black screen problem, but in this case we don’t have to look very far!
Unlike the C64, where it could be almost any component, here there’s a very high chance that it’s the CPU or the TED. If we have to replace the CPU, the cost is not negligible (the TED isn’t cheap either), but there are alternatives.
Now I’ll tell you about all the adapters I’ve physically tested on my C16 (but they work for the others too, apart from the space available).
6510 adapter
Let’s start with the simplest, cheapest and, unfortunately, least compatible solution. That doesn’t mean it’s useless, though, or that it can’t be of use to anyone who doesn’t need certain features of the computer.
This adapter uses the Commodore 64 processor, i.e. the MOS 6500 or 8500.
The adapter is really simple: it has no extra components and, as you can see from the schematic below, the pins are almost identical, just shifted by one position.
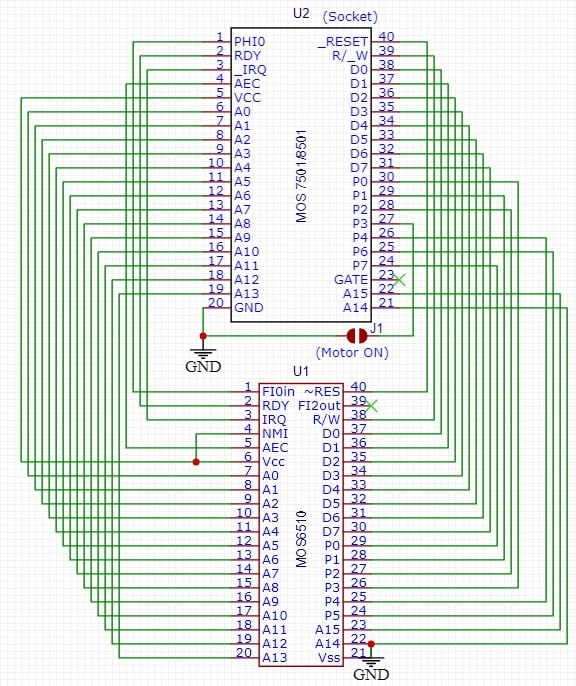
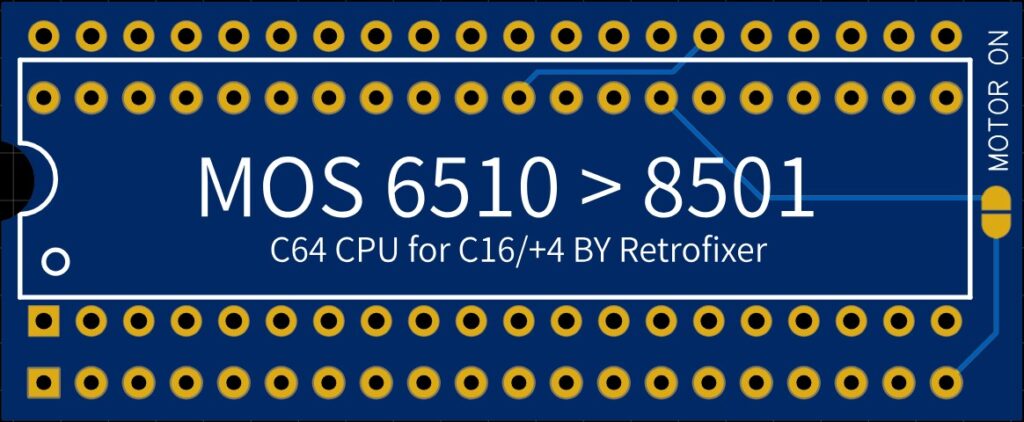
You can find the PCB on PCBWAY!
This is the version I made starting from the schematic you can find online, but I kept the option of handling the cassette motor line to get an extra feature that we’ll see later.
Normally, if we make the adapter using the schematic alongside or the one I made (above) by soldering jumper J1 (Motor ON), the computer will power on without problems, as long as we’re not using a particular memory expansion fitted under the TED.
At first glance we can say Hooray! it works, but in reality it doesn’t take much to run into the first problems.
If we connect a Datassette, it will work (remember jumper J1? That’s what it was for) and we could try loading a program, but taking care to press the C= key quickly when the program name is found, because the tape deck won’t stop.
If we wanted to load a game from disk (load”*”,8), nothing would happen and we’d be stuck on the screen waiting for it to load.
So we can say that with this adapter we have these issues:
- The tape doesn’t stop at FOUND or at the end of loading.
- The cassette motor runs continuously even with no keys pressed.
- We can’t load anything from disk via the serial port (e.g. 1541)
- The computer doesn’t start with the 64K expansion under the TED.
Don’t worry, all is not lost! If you’re not interested in loading from disk, you may already have found the board for you; otherwise, read on.
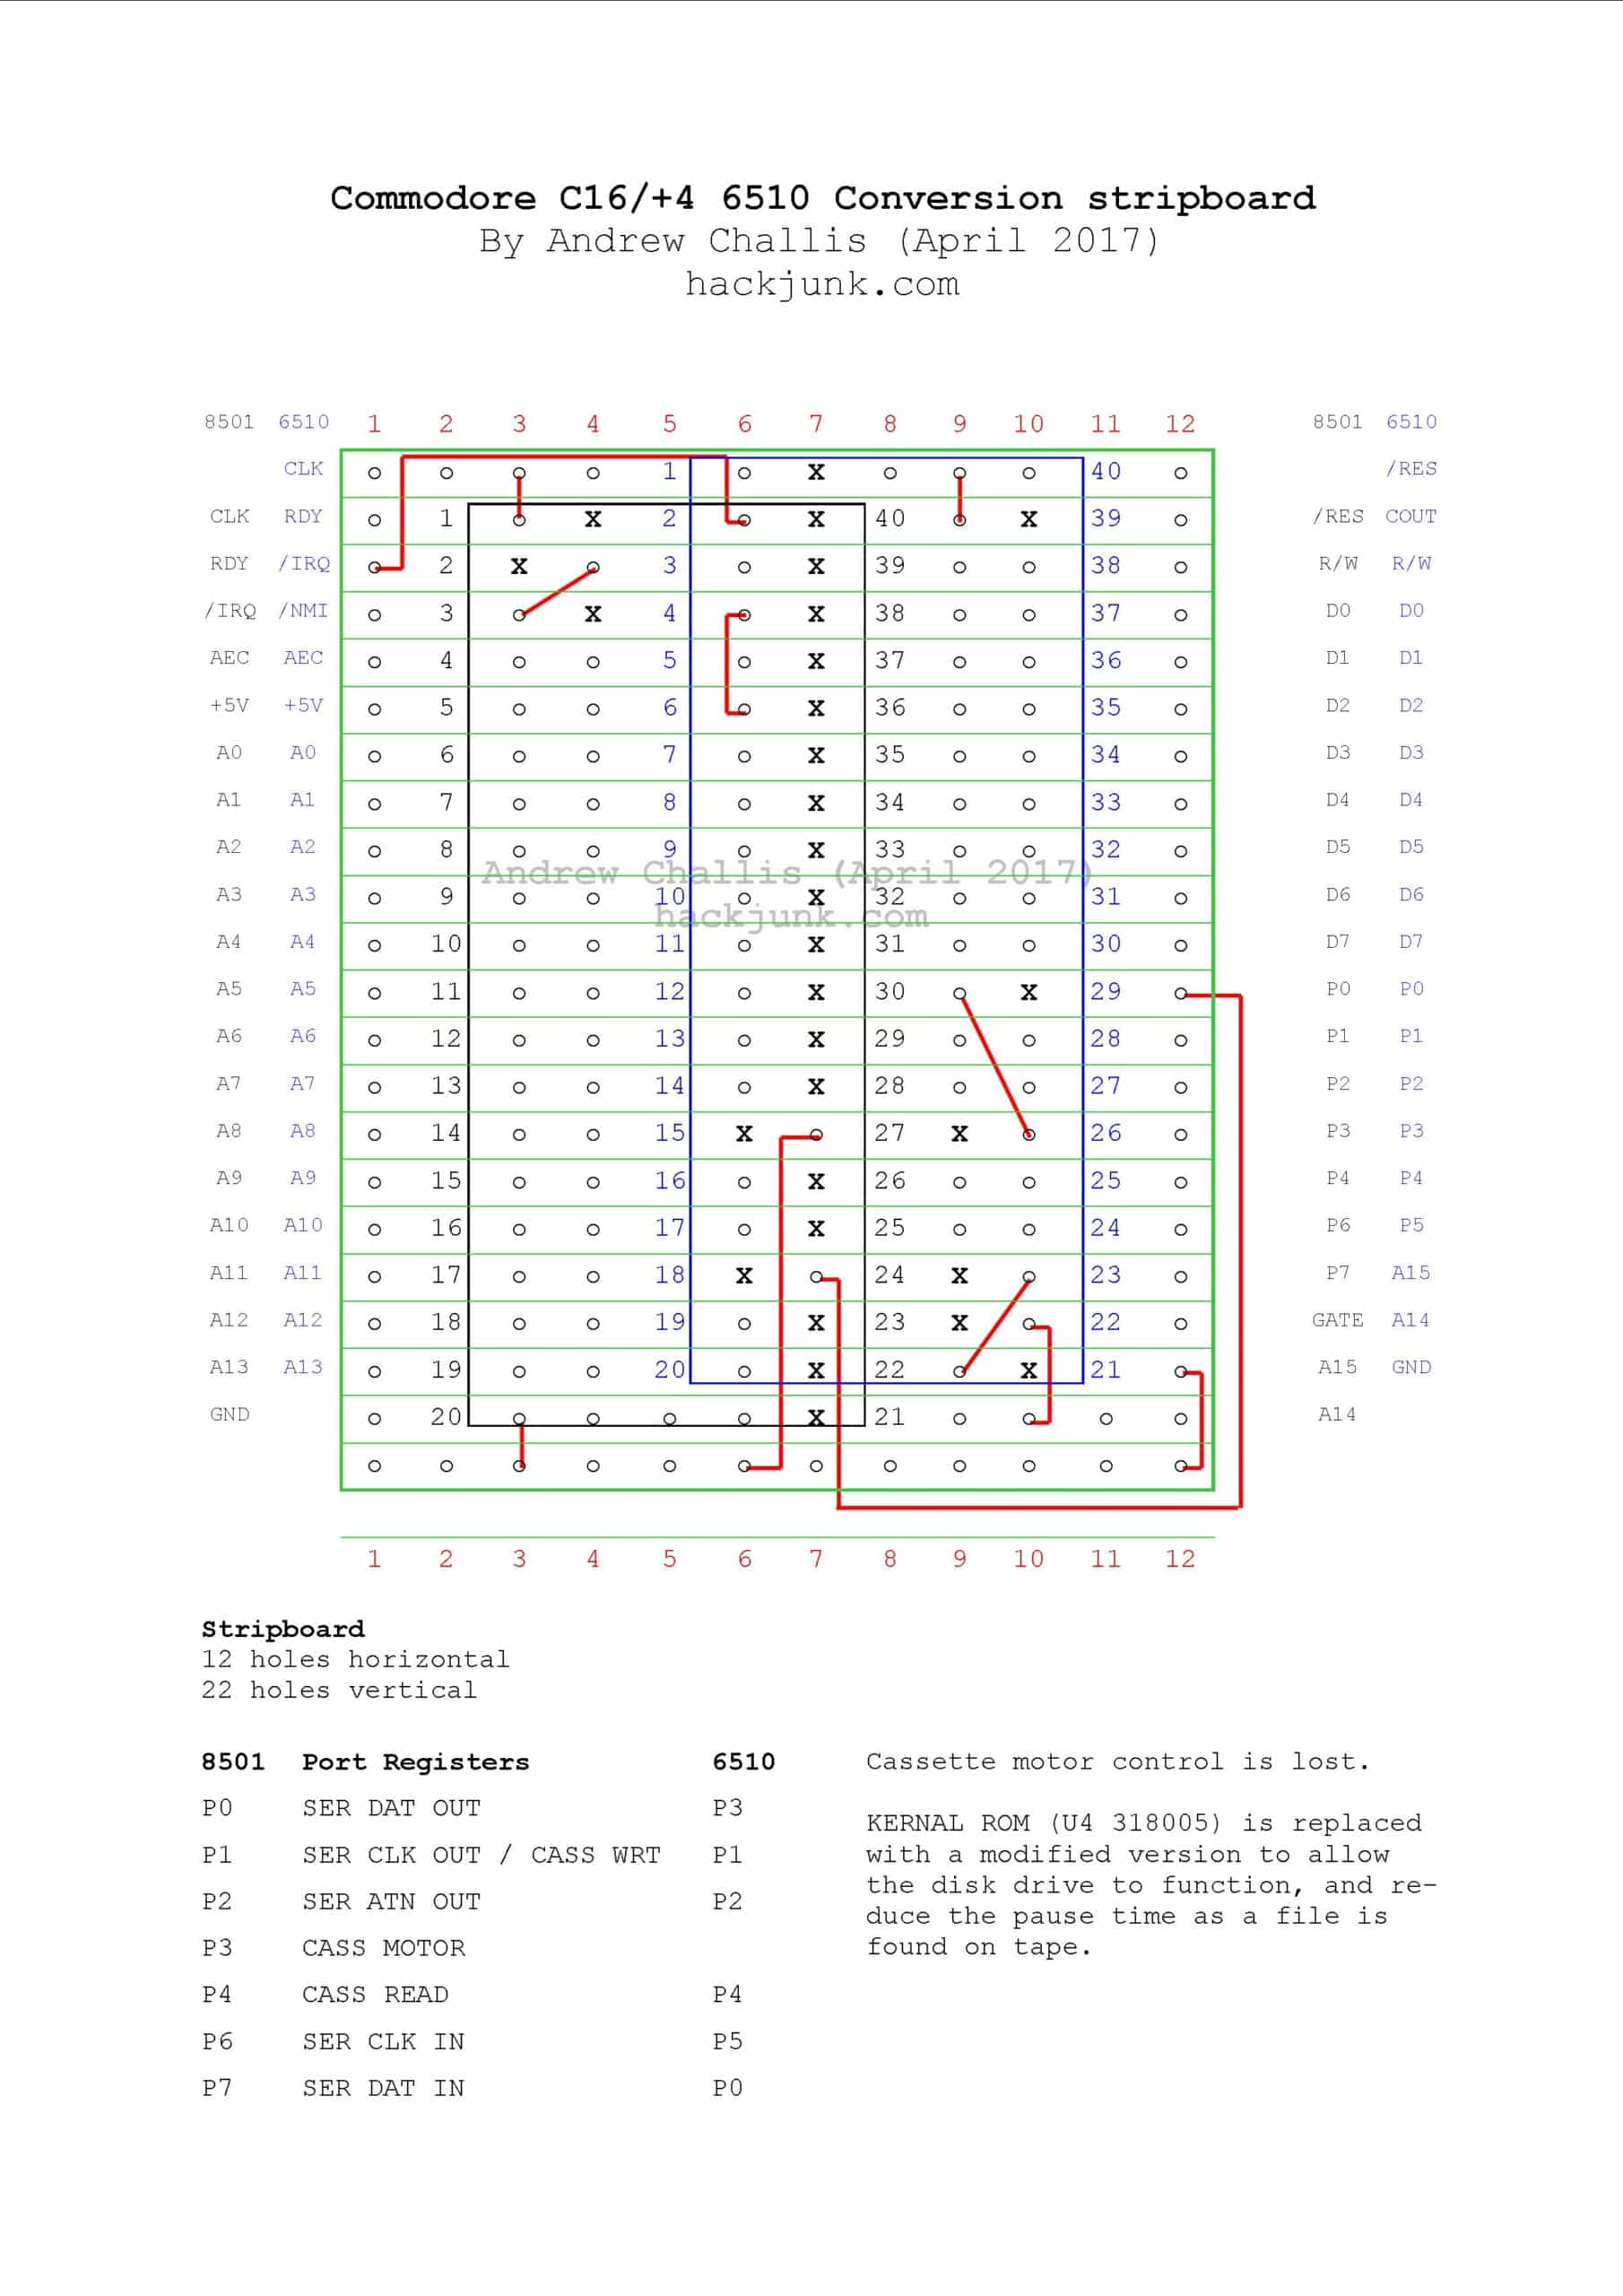
There is a Kernal modification that remaps the functions that differ between the new processor (8501) and the old 6510.
To do this we need a 27C128 EPROM that we can program with the required changes, but since finding a 128 EPROM is starting to get difficult and more expensive than a 256, I recommend getting a 27C256 and writing the contents twice to fill the whole ROM, so there are no problems whether the last address pin is high or low.
Here’s the link where you can find an article on this adapter and the ROM to download:
https://hackjunk.com/2017/06/23/commodore-16-plus-4-8501-to-6510-cpu-conversion/
If you need a program to combine several ROMs together, you can find it here.
What happens now with the Kernal?
With the modified Kernal we can now load from disk without problems, and there’s a much shorter pause when loading from tape, with the computer showing us the name of the program it has found (the FOUND). Beware that this short pause may not be long enough and some particular tapes may lose data; to avoid this we need to be careful and press the C= key straight away
Remember that I’d added the option of breaking the motor line on my PCB?
Now let’s see why.
As we’ve seen, the cassette motor is always powered, and besides being noisy it can also wear out in the long run if we always leave the tape deck connected and use the computer a lot.
To stop the motor running continuously, we can use the tape deck’s “sense” line, pulling the logic that controls the motor line to GND through a diode.


What’s the diode for?
As I was saying, the diode is there because when we press a key on the tape deck, it should tell the CPU to activate the motor line, but since our replacement CPU doesn’t support this function, we do it manually by pulling to GND the inverting line that gives the command to run the motor.
Check the article linked above, the hackjunk one: there you’ll find pictures of the motherboards and where to fit the diode. Any of the common ones such as the 1N4007 or 1N4001 will do, probably a 1N4148 too, but I haven’t tested it.
If we make this modification on the board, the motor line must not be driven by our adapter, so we remove jumper J1; if we have a different board, we need to cut or lift the pin (27 of the 6510) that should go to GND.
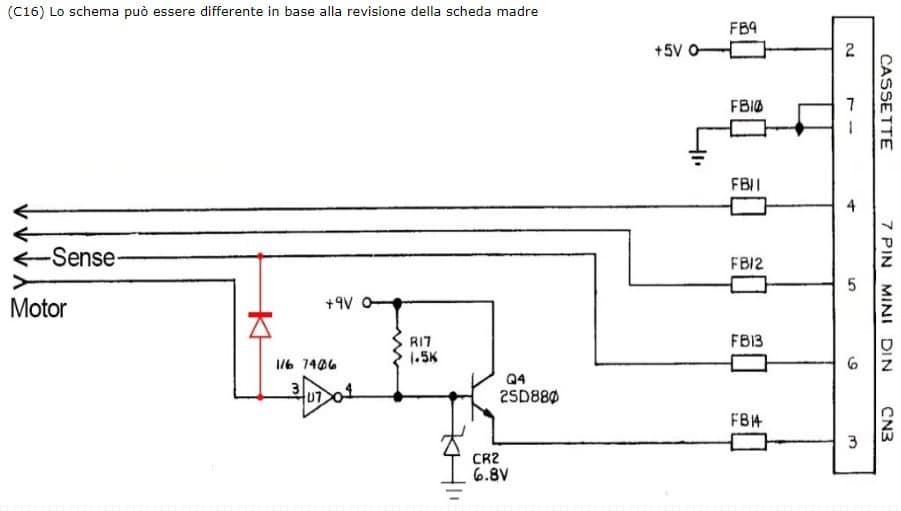
Now, at last, with the Kernal and the diode we have operation almost like the original processor; all that’s left is:
- The tape doesn’t stop at FOUND or at the end of loading.
- The computer doesn’t start with the 64K expansion under the TED.
I invite you to watch the video where I compare the adapters, and to subscribe to the channel to help us carry on with this work.
MOS CPU Replacer (6510/8501)
Here’s another nice, very versatile adapter that can help in a number of situations.
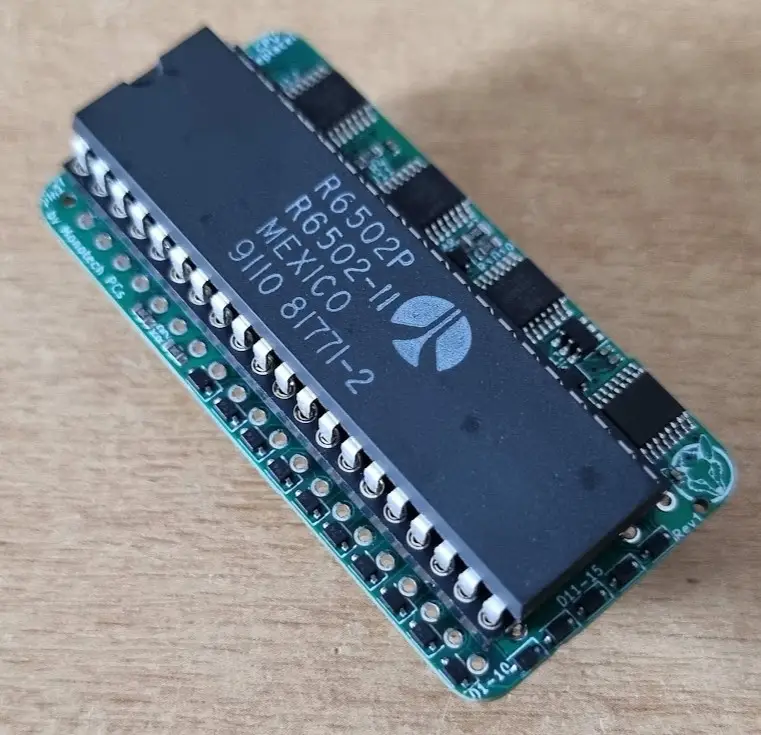
The main feature of this adapter is its versatility: with this board we can turn the MOS6502 into a 6510 to use it as the Commodore 64 CPU, or into a 6510T to replace the so-called NOS CPU of the 1551 drive, or even into the MOS 8502 to replace the Commodore 128 CPU, and finally into our 8501 for the C16/Plus4.
As we’ve seen, it’s a nice board to keep in the drawer and turn into an adapter for our needs when required; the trickiest part is having to convert it again once assembled. Yes, once soldered it’ll be hard to desolder the 40-pin socket, and once that’s removed you’ll have to remove the two rows of header strip and the jumpers made for the configuration.
Its form factor means it fits pretty much everything because it doesn’t stick out much anywhere. I haven’t tried fitting it in the Plus4 to check whether the height with the socket might cause problems with the keyboard, but if so you can simply solder the 6502 without the socket.
Another very useful thing is the option of using the new 65W02 processor, which is currently in production and easy to get hold of.
Building the board is fairly complicated because of the many small, closely spaced SMD components and the pads with little margin. I recommend buying it ready-assembled; you can find it here.
The project page, on the other hand, is this one:
https://github.com/monotech/MOS_CPU_Replacer
On the GitHub page you’ll also find the incompatibilities found so far.
Unfortunately there are a few for the C16: with this board and the expansion under the TED we can’t load a directory, while with the 64K expansion on the motherboard there are no problems apart from a few new-generation games (Slipstream).
Otherwise, the tape works like the real 8501 and the diagnostics pass all tests.
Further down you’ll find the video of part 2, where I test this board.
8501 Equivalent
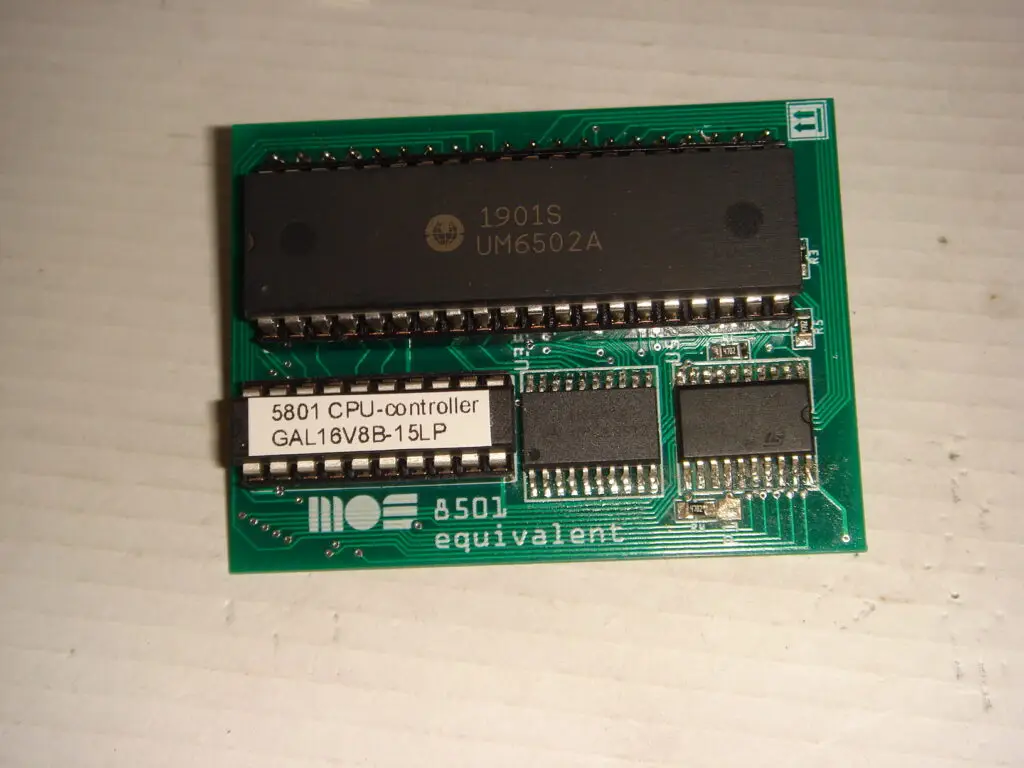
Another nice replacement for our C16 processor is this adapter, which again starts from a 6502 and turns it into an 8501; it’s called 8501 Equivalent or 6502 to 8501.
You’ll find the link to the author’s page in this link and on that same page you’ll find the form to get it ready-assembled, even with the 6502 processor if you need it. If you prefer, you can get just the kit or build it yourself by downloading the Gerber files.
From the photo on the right we can see that it’s not exactly small: it sticks out quite a lot at the bottom, and uses several SMD buffers and a GAL that we can program with the files found on Daniel’s page as well.
This adapter is designed for the C16 and, although it’s very long, the board clears the TED; at most we can use a socket for extra clearance if it really isn’t enough. The problem arises when we want to put heatsinks on the TED: in that case there’s no way to install it except with a stack of sockets (strongly discouraged) or a header strip with long pins.
It can also be fitted to the Plus4, but you mustn’t solder the 6502 socket, to save height and avoid fouling the keyboard.
Compared with the previous adapter, well, this one only does the 8501, but it does it well: it works both with the 64Kb expansion under the TED and, of course, with the one on the motherboard, though it’s bulkier. From the tests carried out it works really well: it runs the new game (Slipstream), the cassette motor works like the original and the diagnostics pass 100%.
At this point all that’s left is to show you all the tests in this video! Here’s part 2.
CPU4C16
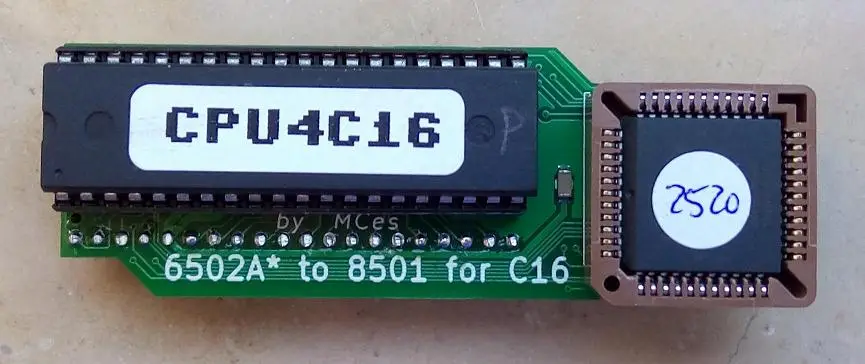
Now let’s move on to another very compact and functional adapter. It uses a 6502A and a CPLD to become, to all intents and purposes, an 8501.
You can find this adapter ready-assembled and complete with a 6502A processor, all at a great price; I’ll leave you the link to buy it. If the link doesn’t work or it has been sold, search Subito yourself for “Commodore CPU per C16”.
From all the tests carried out, I have to say it’s practically perfect: it passed every test, it’s compatible with the 64Kb expansion on the TED, and opcodes and tape deck work. The only odd thing is in the diagnostics, which don’t pass the tape test. This, however, seems to be a false positive: from what I’ve been told, it’s due to an improved routine for tape-loading compatibility, and unfortunately this improvement isn’t accepted by the diagnostics’ check function. I can assure you the tapes loaded perfectly.
If we want to find a flaw, we can say it’s only its shape, which makes it compatible with the Commodore 16 only; for the Plus4 there’s a different PCB with the CPLD at the bottom right instead of on the right. Nothing more.
8501 FPGA
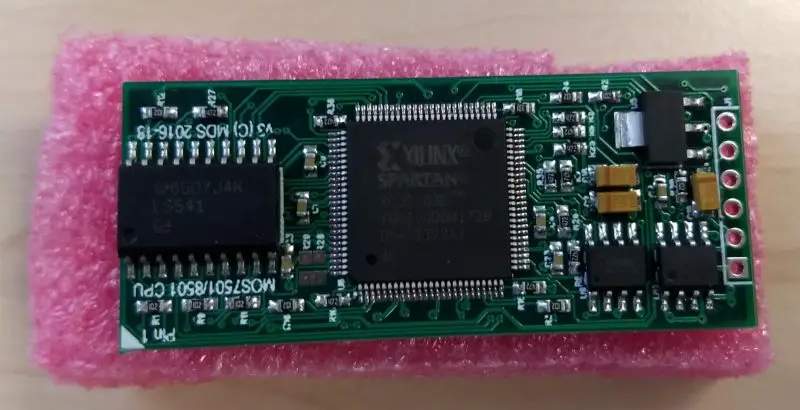
Here we are at the last gem: an FPGA that emulates the 8501 processor!
I couldn’t say whether the emulation is 100% or not; I think it’s a little below, but that’s just my guess. It must be said that, in the tests I did, it worked perfectly with everything, just like the original. Disk and tape loading perfect. Illegal opcodes present, diagnostic tests passed, compatibility with the 64Kb on the TED like the original processor... what can I say, for me it’s perfect.
Its size makes it as compatible as the original processor: it doesn’t stick out, it isn’t tall and it doesn’t have a socket with another processor on top. This makes it compatible with the Commodore 16 and Plus4 without any problems.
But now, after all these good points, let’s look at the downsides too. Well, the only thing I can say is that the price isn’t exactly cheap: it costs as much as an original CPU, if not a bit more once you factor in shipping etc.
It’s worth every penny: the FPGA is known for being a very versatile but not exactly cheap component, and if you add the other components for handling the signals etc., you can see it isn’t a simple board that could also be cheap.
It must be said that, compared with the original CPU, the FPGA doesn’t get hot, uses less power and should last much, much, much longer than the old 8501.
I recommend it for anyone who wants a very compact replacement that works like the original. To buy it (obviously ready-assembled), here’s the SellMyRetro link.
You can also find an article written by Francesco Sblendorio on some tests carried out on this processor; I reused his opcode test. You’ll find it on the website appunti-retrocomputing.blogspot.com
I hope all these tests and trials help you understand and choose the adapter that suits you best!
Here’s the video of the last two adapters...
And remember to subscribe to the channel to help us carry on with this work.
If you like, drop by our Patreon page.

similar posts
2 Comments
Salve, vedo che avete recensito (almeno) una delle mie produzioni: CPU4C16.
Dico “almeno” anche perchè quando nel filmato youtube provate a sostituire un’aspansione 64 interna “sottoTED” che non funziona bene ne mettete sotto un’altra ben funzionante…. che è pure lei una mia creazione! (MCes).
La CPU4C16 (come la CPU4PLUS4) deriva dagli studi fatti per realizzare una CPU sostitutiva con il minimo dei componenti e nessun SMD: la MC85C01 (usava soltanto una CPLD ed un processore W65C02 IN PRODUZIONE e quindi nuovo comprabile dal fornitore senza rischi di acquisto fake cinesi… senza nessun altro componente attivo) ma per sua natura (CPU core C-Mos) non poteva eseguire gli illegal opcode, che purtroppo sono un’esigenza non derogabile.
Ho dovuto quindi riprogettare l’MC85C01 usando per CPU-core un vecchio 6502 N-Mos che purtroppo non è più in produzione da anni, e quindi va comprato sul mercato cinese dove però sotto la sigla “6502A” ti viene venduto di tutto, anche C-Mos o roba ad 1MHz, una volta (indagando i pin con un provagiunzioni) ho trovato un 6522 che mi funziona perfettamente come interfaccia tastiera per un VIC20……. ho anche trovato un paio di “SALLY” per Atari…
Questo per dirti che il motivo per il quale fornisco la schedina completa di processore è che compro stock cinesi di 6502A e poi li testo che siano veramente N-Mos e che abbiano caratteristiche di velocità più stringenti della classe “A” per garantire un corretto funzionamento con le specifiche del bus del PLUS4/C16, alla fine un terzo dei processori viene scartato, ovvero se non lo facessi io ma lasciassi comprare i processori all’utente un terzo di questi probabilmente non vedrebbe funzionare il proprio sostituto (o avrebbe una macchina instabile…).
Sperimentando: lasciando inserita l’unità tape sul mio PLUS4 (unità clone non originale) la mia CPU aveva difficoltà a caricare da disco con JDOS attivato, ed era un fatto curioso, poi ho trovato che le capacità parassite del cavetto dell’unità TAPE erano sufficienti a sporcare i segnali usati per la seriale veloce (alcuni pin di porta su CPU sono in comune alle due unità..) quindi come ottimizzazione ho aggiunto sulla CPLD (che replica la porta parallela della CPU) un filtraggio che annulla tali disturbi ma che, manipolando i segnali, viene letta come anomalia dal DIAG264.
Ho contattato ROB (creatore della DIAG264) che si era detto disponibile a modificare la routine di test della porta CPU, ma alla fine non l’ha mai rilasciata quella nuova versione e non me la sono sentita di premere più di tanto, lasciando cadere la cosa, motivo per cui la DIAG264 dichiara un’anomalia sulla porta TAPE ma questa funziona perfettamente….
Se hai curiosità chiedi pure!
P.S. su Subito gli annunci spariscono quando ti comprano l’oggetto, leggi quì: https://www.amibay.com/threads/8501-replacement-for-c16-plus4-work-in-progress.108904/
A presto!
Salve, si conoscevo il nik di queste creazioni ma non la persona che le aveva create.
Sono ottimi sostituti e dalle prove che ho fatto funzionano benissimo. Mi raccontava un ragazzo, quello che mi ha prestato la CPU per il C16 che sapeva di questo falso errore sulla diagnostica della porta cassette e che in realtà funzionava tutto correttamente. Non sapeva dirmi di preciso perché facesse questo problema ma ora lo so. Anche la storia del 6502A che non è facile da trovare e che viene falsificato dai soliti furbetti..
Comunque complimenti, ottimo lavoro!