Amiga1200 Recap
This time I won't explain how to do it .. I'll show you!
Remember that it is a delicate process, you must always be careful not to damage your computer, take your time.
These are the capacitor values on A1200: (Board Rev .: 1D4)
| Capacity | Voltage | Condenser name |
|---|---|---|
| 10uF | 25V | C214, C306, C407 |
| 22uF | 25V | C303, C304, C324, C334, C459 |
| 47uF | 16V | C821, C822 |
| 100uF | 16V | C235, C236, C239, C409 |
| 470uF | 16V | C237, C307 |
| 1000uF | 20V | C2408, C811 |
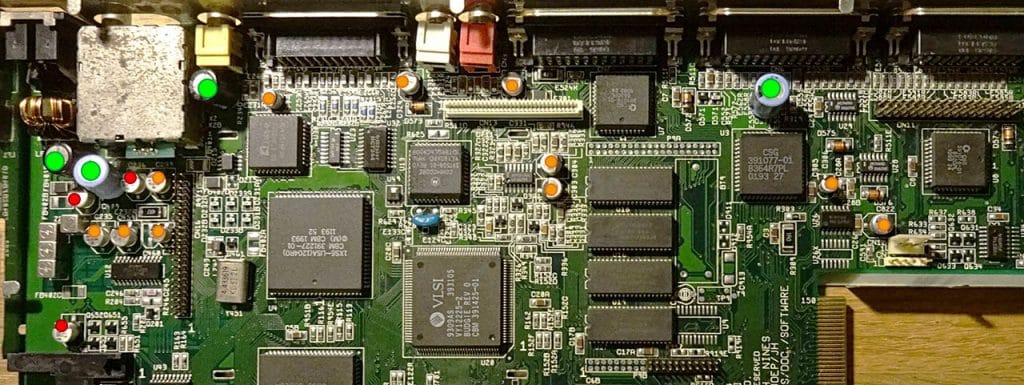
In the photo I highlighted the replaced capacitors:
in red those damaged or that had begun to ruin the track below,
in green the capacitors tested with ESR and good results ed
in orange those replaced but not tested but showing no signs of leakage or swelling.
The result was that obviously not all capacitors were thrown away, but with the passage of time the situation would get worse and probably others would be ruined. On these machines, especially if they use these types of inexpensive electrolytic SMD capacitors, it is always recommended to take a look at them to prevent even more serious damage from being created.
Recapping a machine is usually not complicated, it depends on how many capacitors we have to replace and the space we have to work on it, it is however an operation to be performed carefully especially to avoid damaging the traces of the board.
Keep the diagram handy so you can check that everything is correct.