

Let's build a video game
3 May 2023
UniROM VIC-20 and C64
13 July 2023
can anyone who doesn’t know what a Game Boy is put their hand up? Nobody? Good, I was sure of it! Just as I’m sure that the Game Boy Color is in everyone’s memory too!!
Not everyone knows, though, that its code name was DMG-01 (1989-1990), while the Game Boy Color’s (1998) was CGB-01.
In any case, Nintendo’s first “little” portables are certainly among the most famous gems ever released in the world of consoles, and they are no less than their “big sisters” when it comes to protection systems!
The Game Boy is in fact equipped with a BootROM that we also find in the Game Boy Color (GBC) and in the Super Game Boy (a cartridge adapter for playing GB games on the Super Nintendo).

THE PROTECTION
The BootROM fitted to the GB, GBC and SGB hardware is 256 bytes and has 3 particular “protective” features:
1 – The BootROM itself is locked out from being read by the last instruction of its code (this “lock out” may not have been intentional but was probably necessary for reasons related to the (scarce) system resources; in short, the BootROM is mapped in memory from offset 0x0000 to offset 0x00FF (256 bytes) and the last 2 bytes are an instruction that writes to a special register, blocking that memory address from being read so that all subsequent instructions (which, starting from offset 0x0100, are those contained in the cartridge) cannot read it.
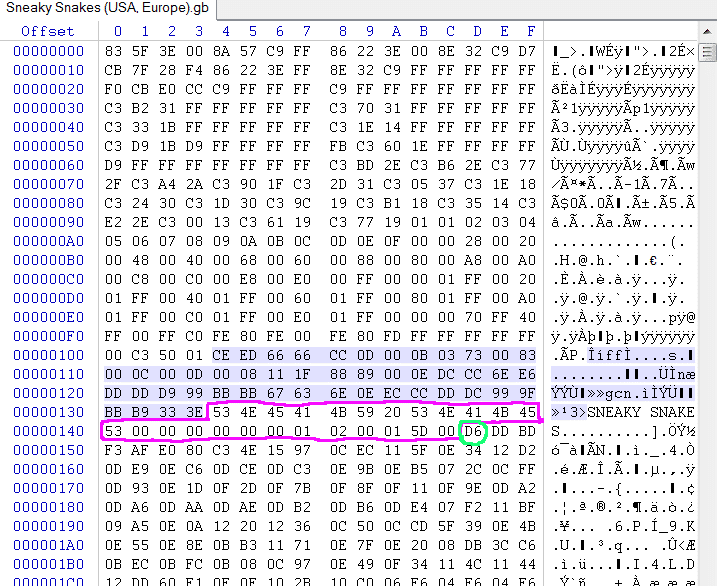
2 – it contains code that reads the 48 bytes of the NINTENDO logo stored in the cartridge (offsets 0x104 to 0x133 of every cartridge)…

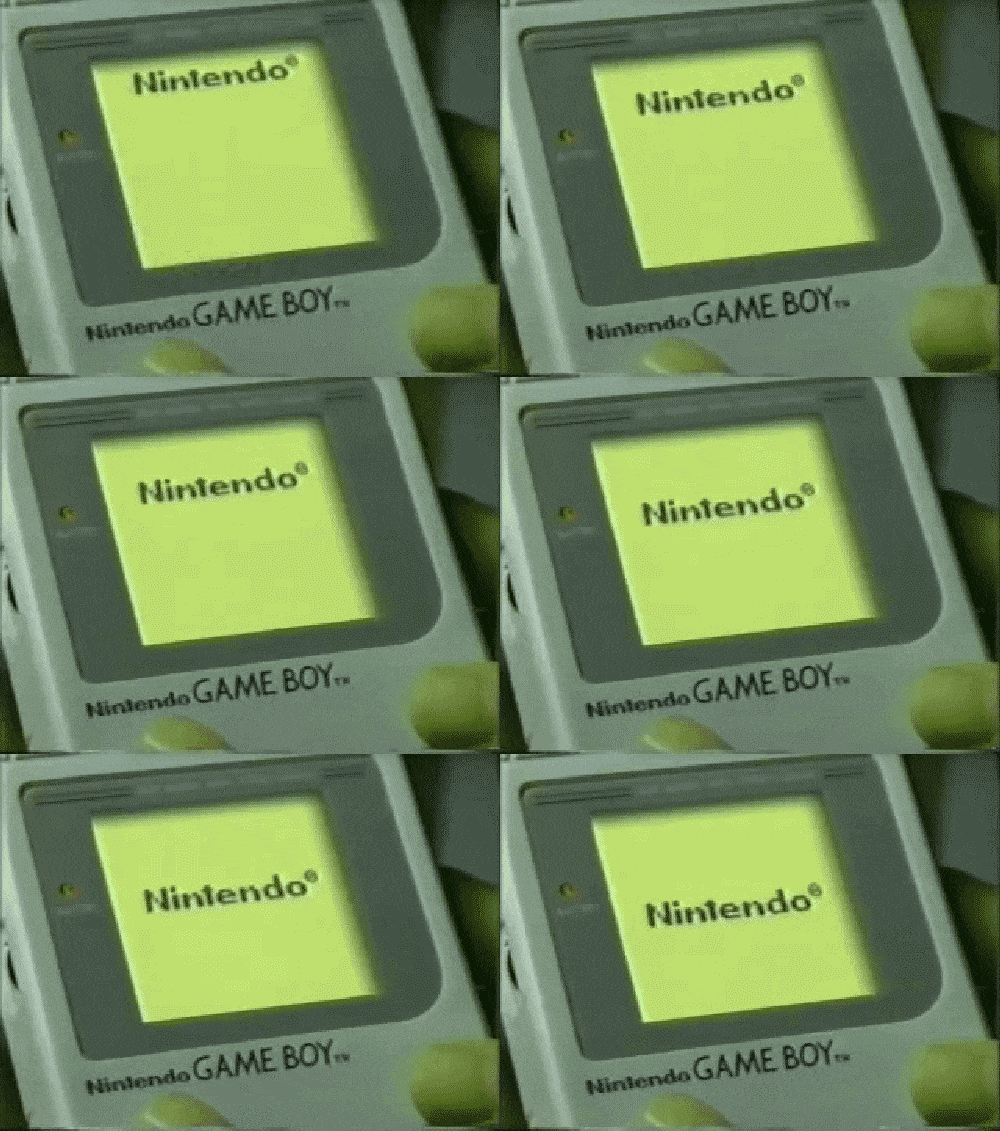
… and displays them on screen, scrolling the well-known logo from top to bottom.
It then compares them with those stored in the BootROM: if they differ, the console locks up.
The fact that the logo is read directly from the cartridge explains why, if you switch on a Game Boy without inserting any game, the black rectangle appears on the right (the logo bytes are all FF).
(for a full description of how the logo bytes work I refer you to this wonderful article)

3 – a second check, carried out after the logo one, adds up the values from offset 0x0134 to 0x014C and then adds the value at 0x014D: if the sum is zero the program continues, otherwise the console locks up!
Here is a screenshot of a random GB ROM where you can check the offsets mentioned:
This protection became necessary to stop other developers from producing software not licensed by Nintendo; as a side note, SEGA later tried the same approach with the Genesis, but its lawsuit against Accolade did not go as planned.
HOW TO BYPASS THE PROTECTION
The contents of this mini operating system remained a mystery until 2003, when the coder Neviksti decapped it (that is, physically “took the lid off” the chip) and read its contents “with the naked eye” bit by bit (256×8 = 2048 bits in total) after photographing them through a microscope; here they are below in all their micro-splendour:

Each “dot” in the image above represents a bit set to 1, while the absence of a dot represents a bit set to 0! The dots are nothing more than the electrical charges stored in the memory cells!!!
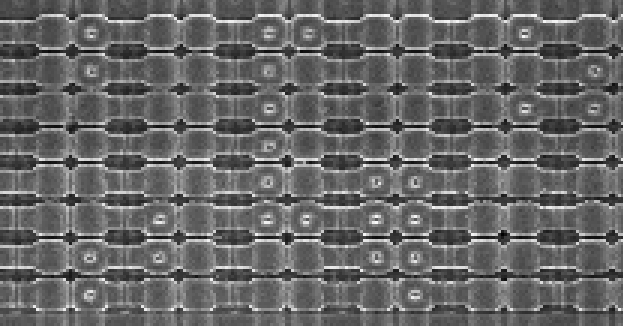
Here on the left is an even more zoomed-in example, obtained by decapping another chip and viewed under an electron microscope (it has nothing to do with consoles):
Here on the right is an example of how the electrical charges are read manually… truly incredible!

Once converted into bytes and then into ASM, the (commented) BootROM code looks like this:
					LD (HL-),A ; $0007
BIT 7,H ; $0008
JR NZ, Addr_0007 ; $000a

LD HL,$ff26 ; $000c Setup Audio
LD C,$11 ; $000f
LD A,$80 ; $0011
LD (HL-),A ; $0013
LD ($FF00+C),A ; $0014
INC C ; $0015
LD A,$f3 ; $0016
LD ($FF00+C),A ; $0018
LD (HL-),A ; $0019
LD A,$77 ; $001a
D (HL),A ; $001c

LD A,$fc ; $001d Setup BG palette
LD ($FF00+$47),A ; $001f

LD DE,$0104 ; $0021 Convert and load logo data from cart into Video RAM
LD HL,$8010 ; $0024
Addr_0027:
LD A,(DE) ; $0027
CALL $0095 ; $0028
CALL $0096 ; $002b
INC DE ; $002e
LD A,E ; $002f
CP $34 ; $0030
JR NZ, Addr_0027 ; $0032

LD DE,$00d8 ; $0034 Load 8 additional bytes into Video RAM
LD B,$08 ; $0037
Addr_0039:
LD A,(DE) ; $0039
INC DE ; $003a
LD (HL+),A ; $003b
INC HL ; $003c
DEC B ; $003d
JR NZ, Addr_0039 ; $003e

LD A,$19 ; $0040 Setup background tilemap
LD ($9910),A ; $0042
LD HL,$992f ; $0045
Addr_0048:
LD C,$0c ; $0048
Addr_004A:
DEC A ; $004a
JR Z, Addr_0055 ; $004b
LD (HL-),A ; $004d
DEC C ; $004e
JR NZ, Addr_004A ; $004f
LD L,$0f ; $0051
JR Addr_0048 ; $0053

; === Scroll logo on screen, and play logo sound===

Addr_0055:
LD H,A ; $0055 Initialize scroll count, H=0
LD A,$64 ; $0056
LD D,A ; $0058 set loop count, D=$64
LD ($FF00+$42),A ; $0059 Set vertical scroll register
LD A,$91 ; $005b
LD ($FF00+$40),A ; $005d Turn on LCD, showing Background
INC B ; $005f Set B=1
Addr_0060:
LD E,$02 ; $0060
Addr_0062:
LD C,$0c ; $0062
Addr_0064:
LD A,($FF00+$44) ; $0064 wait for screen frame
CP $90 ; $0066
JR NZ, Addr_0064 ; $0068
DEC C ; $006a
JR NZ, Addr_0064 ; $006b
DEC E ; $006d
JR NZ, Addr_0062 ; $006e

LD C,$13 ; $0070
INC H ; $0072 increment scroll count
LD A,H ; $0073
LD E,$83 ; $0074
CP $62 ; $0076 $62 counts in, play sound #1
JR Z, Addr_0080 ; $0078
LD E,$c1 ; $007a
CP $64 ; $007c
JR NZ, Addr_0086 ; $007e $64 counts in, play sound #2
Addr_0080:
LD A,E ; $0080 play sound
LD ($FF00+C),A ; $0081
INC C ; $0082
LD A,$87 ; $0083
LD ($FF00+C),A ; $0085
Addr_0086:
LD A,($FF00+$42) ; $0086
SUB B ; $0088
LD ($FF00+$42),A ; $0089 scroll logo up if B=1
DEC D ; $008b
JR NZ, Addr_0060 ; $008c

DEC B ; $008e set B=0 first time
JR NZ, Addr_00E0 ; $008f ... next time, cause jump to "Nintendo Logo check"

LD D,$20 ; $0091 use scrolling loop to pause
JR Addr_0060 ; $0093

; ==== Graphic routine ====

LD C,A ; $0095 "Double up" all the bits of the graphics data
LD B,$04 ; $0096 and store in Video RAM
Addr_0098:
PUSH BC ; $0098
RL C ; $0099
RLA ; $009b
POP BC ; $009c
RL C ; $009d
RLA ; $009f
DEC B ; $00a0
JR NZ, Addr_0098 ; $00a1
LD (HL+),A ; $00a3
INC HL ; $00a4
LD (HL+),A ; $00a5
INC HL ; $00a6
RET ; $00a7

Addr_00A8:
;Nintendo Logo
.DB $CE,$ED,$66,$66,$CC,$0D,$00,$0B,$03,$73,$00,$83,$00,$0C,$00,$0D
.DB $00,$08,$11,$1F,$88,$89,$00,$0E,$DC,$CC,$6E,$E6,$DD,$DD,$D9,$99
.DB $BB,$BB,$67,$63,$6E,$0E,$EC,$CC,$DD,$DC,$99,$9F,$BB,$B9,$33,$3E

Addr_00D8:
;More video data
.DB $3C,$42,$B9,$A5,$B9,$A5,$42,$3C

; ===== Nintendo logo comparison routine =====

Addr_00E0:
LD HL,$0104 ; $00e0 ; point HL to Nintendo logo in cart
LD DE,$00a8 ; $00e3 ; point DE to Nintendo logo in DMG rom

Addr_00E6:
LD A,(DE) ; $00e6
INC DE ; $00e7
CP (HL) ; $00e8 ;compare logo data in cart to DMG rom
JR NZ,$fe ; $00e9 ;if not a match, lock up here
INC HL ; $00eb
LD A,L ; $00ec
CP $34 ; $00ed ;do this for $30 bytes
JR NZ, Addr_00E6 ; $00ef

LD B,$19 ; $00f1
LD A,B ; $00f3
Addr_00F4:
ADD (HL) ; $00f4
INC HL ; $00f5
DEC B ; $00f6
JR NZ, Addr_00F4 ; $00f7
ADD (HL) ; $00f9
JR NZ,$fe ; $00fa ; if $19 + bytes from $0134-$014D don't add to $00
; ... lock up

LD A,$01 ; $00fc
LD ($FF00+$50),A ; $00fe ;turn off DMG rom
|
LD (HL-),A ; $0007 BIT 7,H ; $0008 JR NZ, Addr_0007 ; $000a LD HL,$ff26 ; $000c Setup Audio LD C,$11 ; $000f LD A,$80 ; $0011 LD (HL-),A ; $0013 LD ($FF00+C),A ; $0014 INC C ; $0015 LD A,$f3 ; $0016 LD ($FF00+C),A ; $0018 LD (HL-),A ; $0019 LD A,$77 ; $001a D (HL),A ; $001c LD A,$fc ; $001d Setup BG palette LD ($FF00+$47),A ; $001f LD DE,$0104 ; $0021 Convert and load logo data from cart into Video RAM LD HL,$8010 ; $0024 Addr_0027: LD A,(DE) ; $0027 CALL $0095 ; $0028 CALL $0096 ; $002b INC DE ; $002e LD A,E ; $002f CP $34 ; $0030 JR NZ, Addr_0027 ; $0032 LD DE,$00d8 ; $0034 Load 8 additional bytes into Video RAM LD B,$08 ; $0037 Addr_0039: LD A,(DE) ; $0039 INC DE ; $003a LD (HL+),A ; $003b INC HL ; $003c DEC B ; $003d JR NZ, Addr_0039 ; $003e LD A,$19 ; $0040 Setup background tilemap LD ($9910),A ; $0042 LD HL,$992f ; $0045 Addr_0048: LD C,$0c ; $0048 Addr_004A: DEC A ; $004a JR Z, Addr_0055 ; $004b LD (HL-),A ; $004d DEC C ; $004e JR NZ, Addr_004A ; $004f LD L,$0f ; $0051 JR Addr_0048 ; $0053 ; === Scroll logo on screen, and play logo sound=== Addr_0055: LD H,A ; $0055 Initialize scroll count, H=0 LD A,$64 ; $0056 LD D,A ; $0058 set loop count, D=$64 LD ($FF00+$42),A ; $0059 Set vertical scroll register LD A,$91 ; $005b LD ($FF00+$40),A ; $005d Turn on LCD, showing Background INC B ; $005f Set B=1 Addr_0060: LD E,$02 ; $0060 Addr_0062: LD C,$0c ; $0062 Addr_0064: LD A,($FF00+$44) ; $0064 wait for screen frame CP $90 ; $0066 JR NZ, Addr_0064 ; $0068 DEC C ; $006a JR NZ, Addr_0064 ; $006b DEC E ; $006d JR NZ, Addr_0062 ; $006e LD C,$13 ; $0070 INC H ; $0072 increment scroll count LD A,H ; $0073 LD E,$83 ; $0074 CP $62 ; $0076 $62 counts in, play sound #1 JR Z, Addr_0080 ; $0078 LD E,$c1 ; $007a CP $64 ; $007c JR NZ, Addr_0086 ; $007e $64 counts in, play sound #2 Addr_0080: LD A,E ; $0080 play sound LD ($FF00+C),A ; $0081 INC C ; $0082 LD A,$87 ; $0083 LD ($FF00+C),A ; $0085 Addr_0086: LD A,($FF00+$42) ; $0086 SUB B ; $0088 LD ($FF00+$42),A ; $0089 scroll logo up if B=1 DEC D ; $008b JR NZ, Addr_0060 ; $008c DEC B ; $008e set B=0 first time JR NZ, Addr_00E0 ; $008f … next time, cause jump to “Nintendo Logo check” LD D,$20 ; $0091 use scrolling loop to pause JR Addr_0060 ; $0093 ; ==== Graphic routine ==== LD C,A ; $0095 “Double up” all the bits of the graphics data LD B,$04 ; $0096 and store in Video RAM Addr_0098: PUSH BC ; $0098 RL C ; $0099 RLA ; $009b POP BC ; $009c RL C ; $009d RLA ; $009f DEC B ; $00a0 JR NZ, Addr_0098 ; $00a1 LD (HL+),A ; $00a3 INC HL ; $00a4 LD (HL+),A ; $00a5 INC HL ; $00a6 RET ; $00a7 Addr_00A8: ;Nintendo Logo .DB $CE,$ED,$66,$66,$CC,$0D,$00,$0B,$03,$73,$00,$83,$00,$0C,$00,$0D .DB $00,$08,$11,$1F,$88,$89,$00,$0E,$DC,$CC,$6E,$E6,$DD,$DD,$D9,$99 .DB $BB,$BB,$67,$63,$6E,$0E,$EC,$CC,$DD,$DC,$99,$9F,$BB,$B9,$33,$3E Addr_00D8: ;More video data .DB $3C,$42,$B9,$A5,$B9,$A5,$42,$3C ; ===== Nintendo logo comparison routine ===== Addr_00E0: LD HL,$0104 ; $00e0 ; point HL to Nintendo logo in cart LD DE,$00a8 ; $00e3 ; point DE to Nintendo logo in DMG rom Addr_00E6: LD A,(DE) ; $00e6 INC DE ; $00e7 CP (HL) ; $00e8 ;compare logo data in cart to DMG rom JR NZ,$fe ; $00e9 ;if not a match, lock up here INC HL ; $00eb LD A,L ; $00ec CP $34 ; $00ed ;do this for $30 bytes JR NZ, Addr_00E6 ; $00ef LD B,$19 ; $00f1 LD A,B ; $00f3 Addr_00F4: ADD (HL) ; $00f4 INC HL ; $00f5 DEC B ; $00f6 JR NZ, Addr_00F4 ; $00f7 ADD (HL) ; $00f9 JR NZ,$fe ; $00fa ; if $19 + bytes from $0134-$014D don’t add to $00 ; … lock up LD A,$01 ; $00fc LD ($FF00+$50),A ; $00fe ;turn off DMG rom |
In 2009 another reverser (Costis Sideris) managed to dump the Super Game Boy BootROM by using an FPGA to exploit a hardware glitch: by sending overclocked pulses he disabled the last lock-out instruction of the memory holding the copy of the BootROM, and so managed to dump the code from offset 0x0000 to offset 0x00FF with specific code placed from offset 0x0100 onwards. Here is a photo of the “simple” setup used:
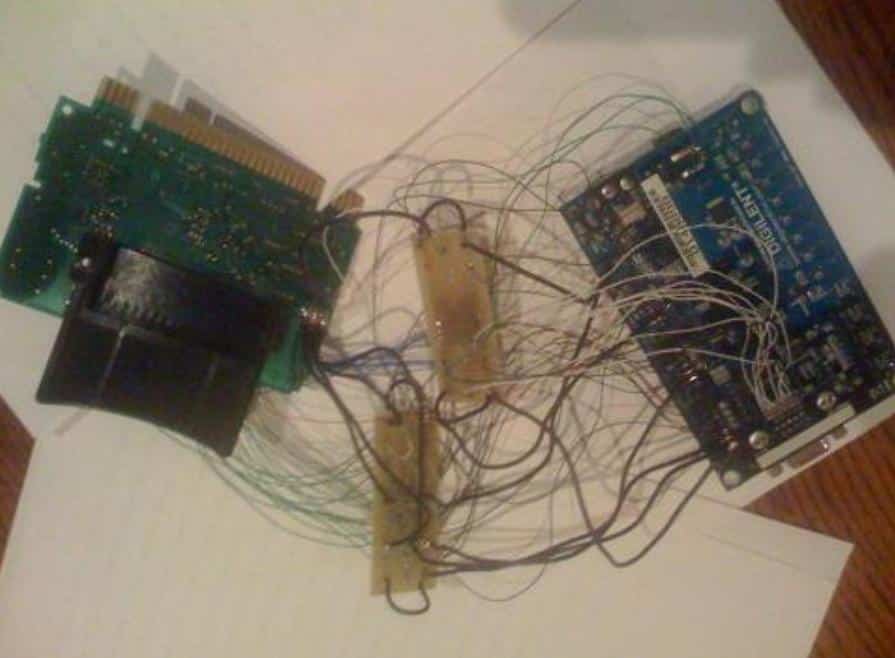
Examining the code of this BootROM revealed that, if the logo check fails or the second checksum (the sum that must equal 0) is not 0, it is not the cartridge adapter that disables the game cartridge but the Super Nintendo itself. Furthermore, by desoldering the CPU of a Super Game Boy and soldering it in place of a DMG-01’s, you even skip the Nintendo logo, saving about 5 seconds of boot time, because the SNES handles the checks rather than the SGB CPU, de facto “unprotecting” the DMG!
Again Costis Sideris, and again in 2009, also managed to dump the Game Boy Color BootROM, this time using a combination of both clock and power glitches through an FPGA. In this dump he noticed that the logo check was only performed on the first half of the bytes rather than all 48. Along with it he managed to dump the contents of a second 1792-byte ROM present in this console. Dr. Decapitator (aka Christopher Tarnovsky) attempted a partial decap, even identifying 3 ROMs (256, 1792 and 512 bytes), but no dump of the 512-byte one has been obtained (it may contain the CPU microcode or LCD-related code).
So these are secrets cracked after more than a decade! Moreover, in 2012 the patent describing the BootROM’s functions also expired, confirming what the reverse engineers had discovered.
Once the workings of the BootROM had been discovered, some developers came up with ways to make the Game Boy read a custom logo from the cartridge at the usual offset (the first phase carried out by the bootrom, which displays the logo) but then check a second logo (the official one, during the second phase where it is read again and checked) stored at another offset of the cartridge. The results look like this:
You can find a nice description of the various kinds of custom logos produced by some developers HERE and further information on BootROMs (including the one found in a prototype Pokemon Stadium cartridge for the Nintendo 64, missing from its official release) here.
You can read more information on the GBC BootROM here.

similar posts